/
Blog


Mastering Rive Animation: A Complete Guide for React Developers
In modern web development, creating lively and exciting user experiences (UX) requires more than just simple CSS transitions. We need complex, interactive animations that look great but don’t slow down the app. This is why Rive has become a powerful “secret weapon” in our technology stack. Today, let’s explore the full process of using Rive […]

4 min read
0 Views
In modern web development, creating lively and exciting user experiences (UX) requires more than just simple CSS transitions. We need complex, interactive animations that look great but don’t slow down the app. This is why Rive has become a powerful “secret weapon” in our technology stack.
Today, let’s explore the full process of using Rive in our project, from understanding what it is to designing the architecture and implementing it using our real source code.
1. Rive Basics – From Design to Code
Before looking at the code, let’s understand the “ingredients” we are using. Understanding this process helps Developers and Designers work together better.
1. What is Rive? And How Do We Create It?
Rive is a complete ecosystem that includes a Design Tool (Editor) and a Runtime engine for code. It is different from Lottie (which just plays a JSON file) or Video. Rive acts like a real interactive machine.
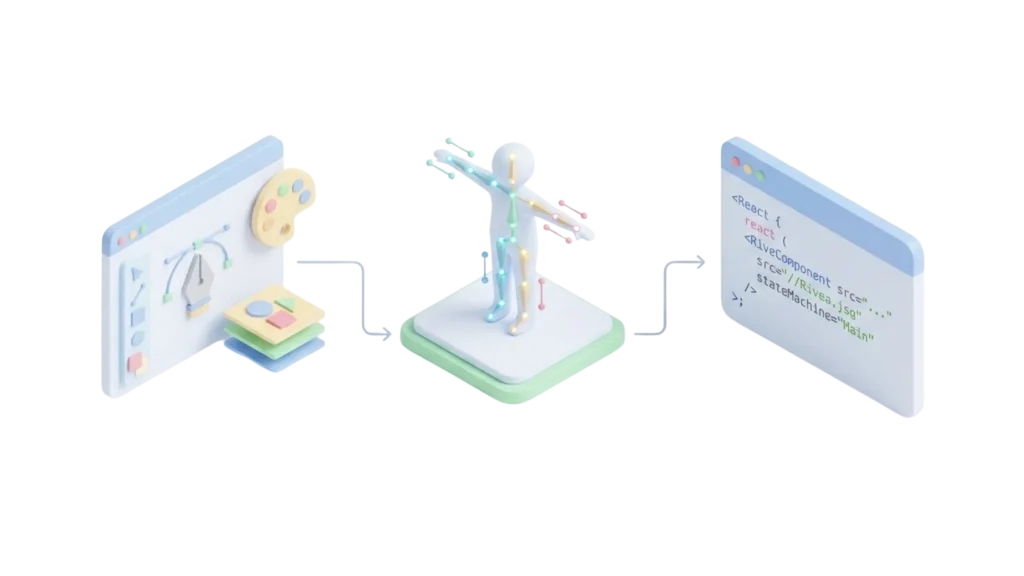
The Workflow:
Working with Rive is like combining Figma (for drawing) and After Effects (for movement), plus a bit of logic like Unity games.
- Design:
- Designers use the Rive Editor on the web or desktop.
- They can draw directly in Rive or import items from Figma.
- Tip: Always name layers clearly (e.g., “UserAvatar”, “ScoreText”) so developers can find them easily in the code.
- Animate:
- Designers use a Timeline to create movements (like
Run,Jump,Idle). - Rive uses “bones” (skeletal animation), making characters move very smoothly.
- Designers use a Timeline to create movements (like
- State Machine (The Logic):
- This is the best part. Designers connect animations using logic.
- Example: Switch from
IdletoRunningwhen the inputisRunningistrue. - Dev & Design Collaboration: We need to agree on the Input names (like Triggers, Numbers, Booleans) so React can control the animation perfectly.
2. The Difference Between .REV and .RIV
Many people get confused by these two file types.
.REV(Source File): This is the project file. It contains everything uncompressed. It is like a.PSDfile in Photoshop. You keep this safe to edit later. Do not put this in your app code..RIV(Runtime File): This is the final product. It is binary, optimized, and very small. It is ready to run on the web. This is what we put in oursrc/assetsfolder.
3. Where to Find Free Rive Files?
If you want to practice but don’t have a designer, check out the Rive Community. It is like “GitHub for Animations.” You can search for “Loading” or “Button,” click “Remix,” see how they made it, and export the .riv file for free.
4. Playground
2. Technical Implementation in Our Architecture
To avoid repeating code and to keep our project clean, we don’t use the standard useRive library everywhere. Instead, we built a strong system around a custom hook called useRiveAnimation.
1. Project Structure
Based on our current codebase, here is how we organize things:
src/constants/rive.js: We define Artboard names, State Machines, and Input names here. This prevents spelling mistakes.src/utils/riveUtils.js: Helper functions to create configurations quickly.src/hooks/useRiveAnimation.js: The “heart” of our system. It handles loading, updates, and events.src/view/shared/.../Templates: The actual UI components (like Popups, Banners, Widgets) that use the hook.
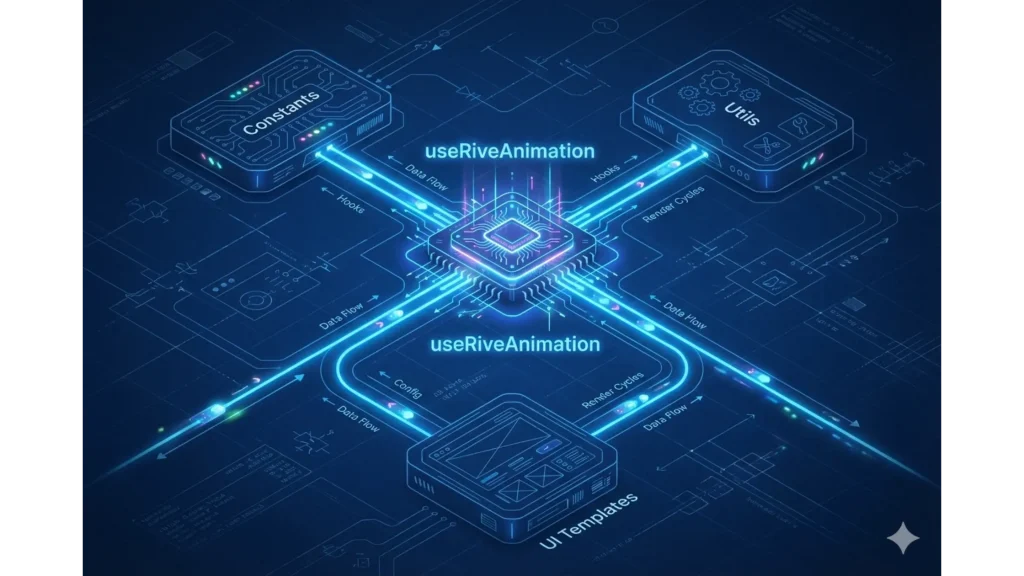
2. Deep Dive: The useRiveAnimation Hook
This hook solves the hard problems: Loading states, Error handling, and most importantly, Dynamic Content Updates (changing text or images inside the animation).

How it works:
The hook accepts a config object with src, artboard, and stateMachines.
// A simplified look at src/hooks/useRiveAnimation.js
const { rive, RiveComponent } = useRive({
    src: finalSrc,
    artboard: artboard,
    stateMachines: stateMachines,
    autoplay: autoplay,
    // ...
});
Key Feature: Dynamic Updates
We can change text (like a countdown timer) or images (like a user avatar) inside the running animation file using updateMultipleContents.
We support different RiveFieldTypes:
- String: Change text content.
- Image: Swap an image inside the animation.
- Trigger/Boolean/Number: Control the logic/flow of the animation.
The code uses Promise.all to update everything at the same time for better performance:
// Efficient batch updating
const updateMultipleContents = useCallback(async (updates, artboardPath) => {
    // ... logic to find the view model ...
    const promises = updates.map(({ path, type, value }) => {
        switch (type) {
            case RiveFieldType.String: return updateStringValue(vmi, path, value);
            case RiveFieldType.Image: return updateImageValue(vmi, path, value);
            // ... handle other types
        }
    });
    await Promise.allSettled(promises);
}, [rive]);
3. How to Implement (Step-by-Step Guide)
Let’s imagine we are building a Countdown Widget (similar to WidgetManager/Templates/RiveAnimationTemplate.jsx).

Step 1: Prepare Constants
Define the Inputs that the Designer created in the Rive file.
// src/constants/rive.js
export const WIDGET_STATE_MACHINE = "Widget SM";
export const RiveInputs = {
    WidgetIn: "Widget In",   // Trigger: Play appear animation
    WidgetHover: "Hover",    // Boolean: Is mouse hovering?
};
export const RiveFields = {
    Time: "Timer/Time",      // Path to the text object in Rive
};
Step 2: Use the Hook in Your Component
Connect the hook. Always check isLoaded before showing the component.
const WidgetRive = ({ endTime }) => {
    const {
        RiveComponent,
        isLoaded,
        updateMultipleContents,
        triggerStateMachineInput
    } = useRiveAnimation({
        src: "assets/widget.riv",
        artboard: "Main",
        stateMachines: WIDGET_STATE_MACHINE,
        autoplay: false, // We will play it manually later
    });

    // Update the timer every second
    useEffect(() => {
        if (isLoaded && endTime) {
             const timeStr = calculateTimeLeft(endTime);
             // Send new text to Rive
             updateMultipleContents([
                 new RivePropertyUpdate(RiveFields.Time, RiveFieldType.String, timeStr)
             ]);
        }
    }, [isLoaded, endTime]);

    return (
        <div className="widget-container">
            {!isLoaded && <CircularProgress />} {/* Show loading spinner */}
            <RiveComponent />
        </div>
    );
};
Step 3: Handling Interactions
In our BannerManager, we handle user clicks and hovers easily:
const handleMouseEnter = () => {
    // Tell Rive the mouse is over the banner
    triggerStateMachineInput(WIDGET_STATE_MACHINE, RiveInputs.WidgetHover, true);
};

const handleMouseLeave = () => {
    triggerStateMachineInput(WIDGET_STATE_MACHINE, RiveInputs.WidgetHover, false);
};
4. Best Practices & Tips
To make your animations smooth (60 FPS) and bug-free, follow these tips from our source code:
- Caching View Models:
Our hook caches the instance (vmiDataRef). This is crucial. If you update a timer every second without caching, Rive has to search for the text object 60 times a minute, which causes lag. - Resource Load Guard:
Don’t render the Rive component until the file is actually downloaded, especially in Popups.<ResourceLoadGuard enabled={open} rives={[{ src: fileSrc }]}> <PopupBase>...</PopupBase> </ResourceLoadGuard> - Prevent “Flickering”:
Sometimes Rive shows the default text (“Text”) for a split second before your data loads. To fix this:- Set
autoplay: falseinitially. - Wait for
isLoaded. - Call
updateMultipleContentsto set your data. - Then call
play().
- Set
- Handling Errors:
Always have a Plan B. If the.rivfile fails to load (404 error), theisErrorvariable in the hook will be true. Use this to show a static image or a close button so the user isn’t stuck.
The Last Word
Rive is more than just a decoration tool. It separates the movement logic from the React code. This allows Designers to make things beautiful and Developers to focus on the data.
By mastering the useRiveAnimation hook, you can build Widgets, Banners, and Popups that feel premium and incredibly smooth. Happy coding!

Related Posts

Overview: The Critical Role of Images in Modern Web Development Images are fundamental to web experiences, accounting for approximately 50% of a typical webpage’s total size. How you choose to render these assets significantly impacts user experience, page performance, and search engine rankings. As web technologies evolve, developers have multiple options for implementing images in […]
 Essential Responsive Design Tips for React Developers
Creating truly responsive web applications that work perfectly from small 320px mobile screens to 4K displays requires a strategic approach. This guide provides practical

Discover how to accelerate your website through our powerful triple-layered caching strategy combining Memory Cache, IndexedDB, and HTTP Cache. Detailed guidance from theory to practice helps reduce page load time by up to 96%, improve user experience, and optimize performance across all devices.
Subscribe to our newsletter
Get the latest posts delivered right to your inbox